Achilles tendon rupture treated with VACOped® Boot: rehabilitation programme and exercises
Information for patients
This booklet gives you an outline of how your rehabilitation will progress, as you recover from your Achilles tendon rupture. It is only a guide, and can be changed to meet your needs.
The following time frame is a guide. It may change depending on your progress.
If you are fitted into a VACOped® Boot and have not received an appointment within 2 weeks, please contact the Physiotherapy Department on 01227 783065. Give your name, date of birth, and the date of your injury. We will make sure you are appropriately followed-up.
What is an Achilles tendon rupture? What are the benefits of the VACOped® Boot?
An Achilles tendon rupture is a break of the tendon at the back of the ankle, that connects the calf with the back of the foot. When that tendon breaks, you cannot push up onto your toes, and walking is affected.
To heal the tendon, both ends of the tendon need to be brought closer together. For that to happen, for the first 4 weeks you need to have:
your foot pointing down (equinus position); and
your movement restricted.
After 4 weeks, you can start moving gently. Wearing the VACOped® Boot can help this to happen more easily.
The treatment with the boot will take about 9 to 10 weeks (unless you are told otherwise). However, full recovery can take up to a year. You need to be aware and sensible about your affected leg. Follow the advice from the professionals looking after you. Do not push yourself too much, as there is a risk that your Achilles tendon will rupture again. You will use crutches for at least the first few weeks.
What do I do if I need help using my crutches?
If you need help using your crutches, please read the Using crutches leaflet.
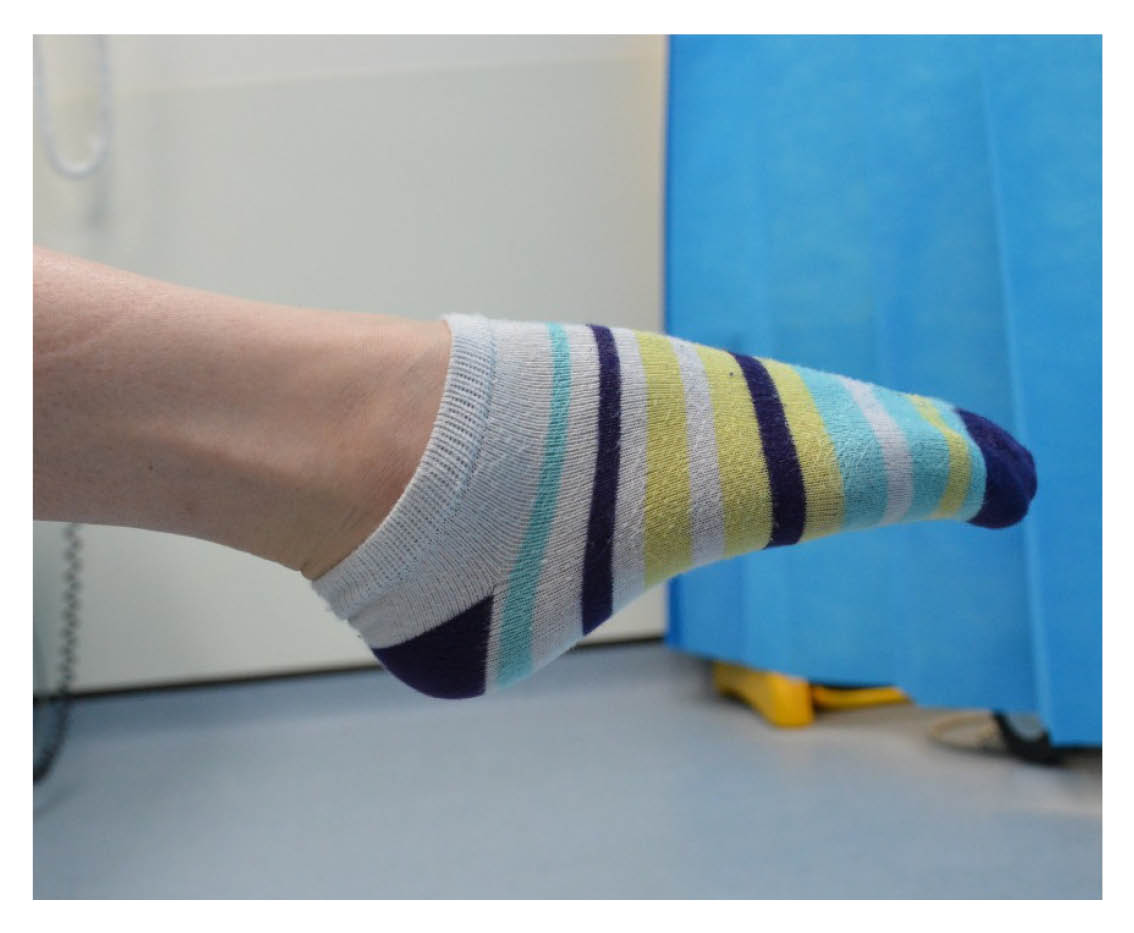
If using crutches causes you pain in your hands, you can:
put extra padding on the handles, such as a fleece sock; or
buy some hand protectors.
How do I safely use the stairs while having a cast on or wearing my boot?
Using stairs while non-weight bearing / wearing a cast is not advised due to health and safety risks. Only do this if you have been shown how to by one of the hospital’s physiotherapists.
-
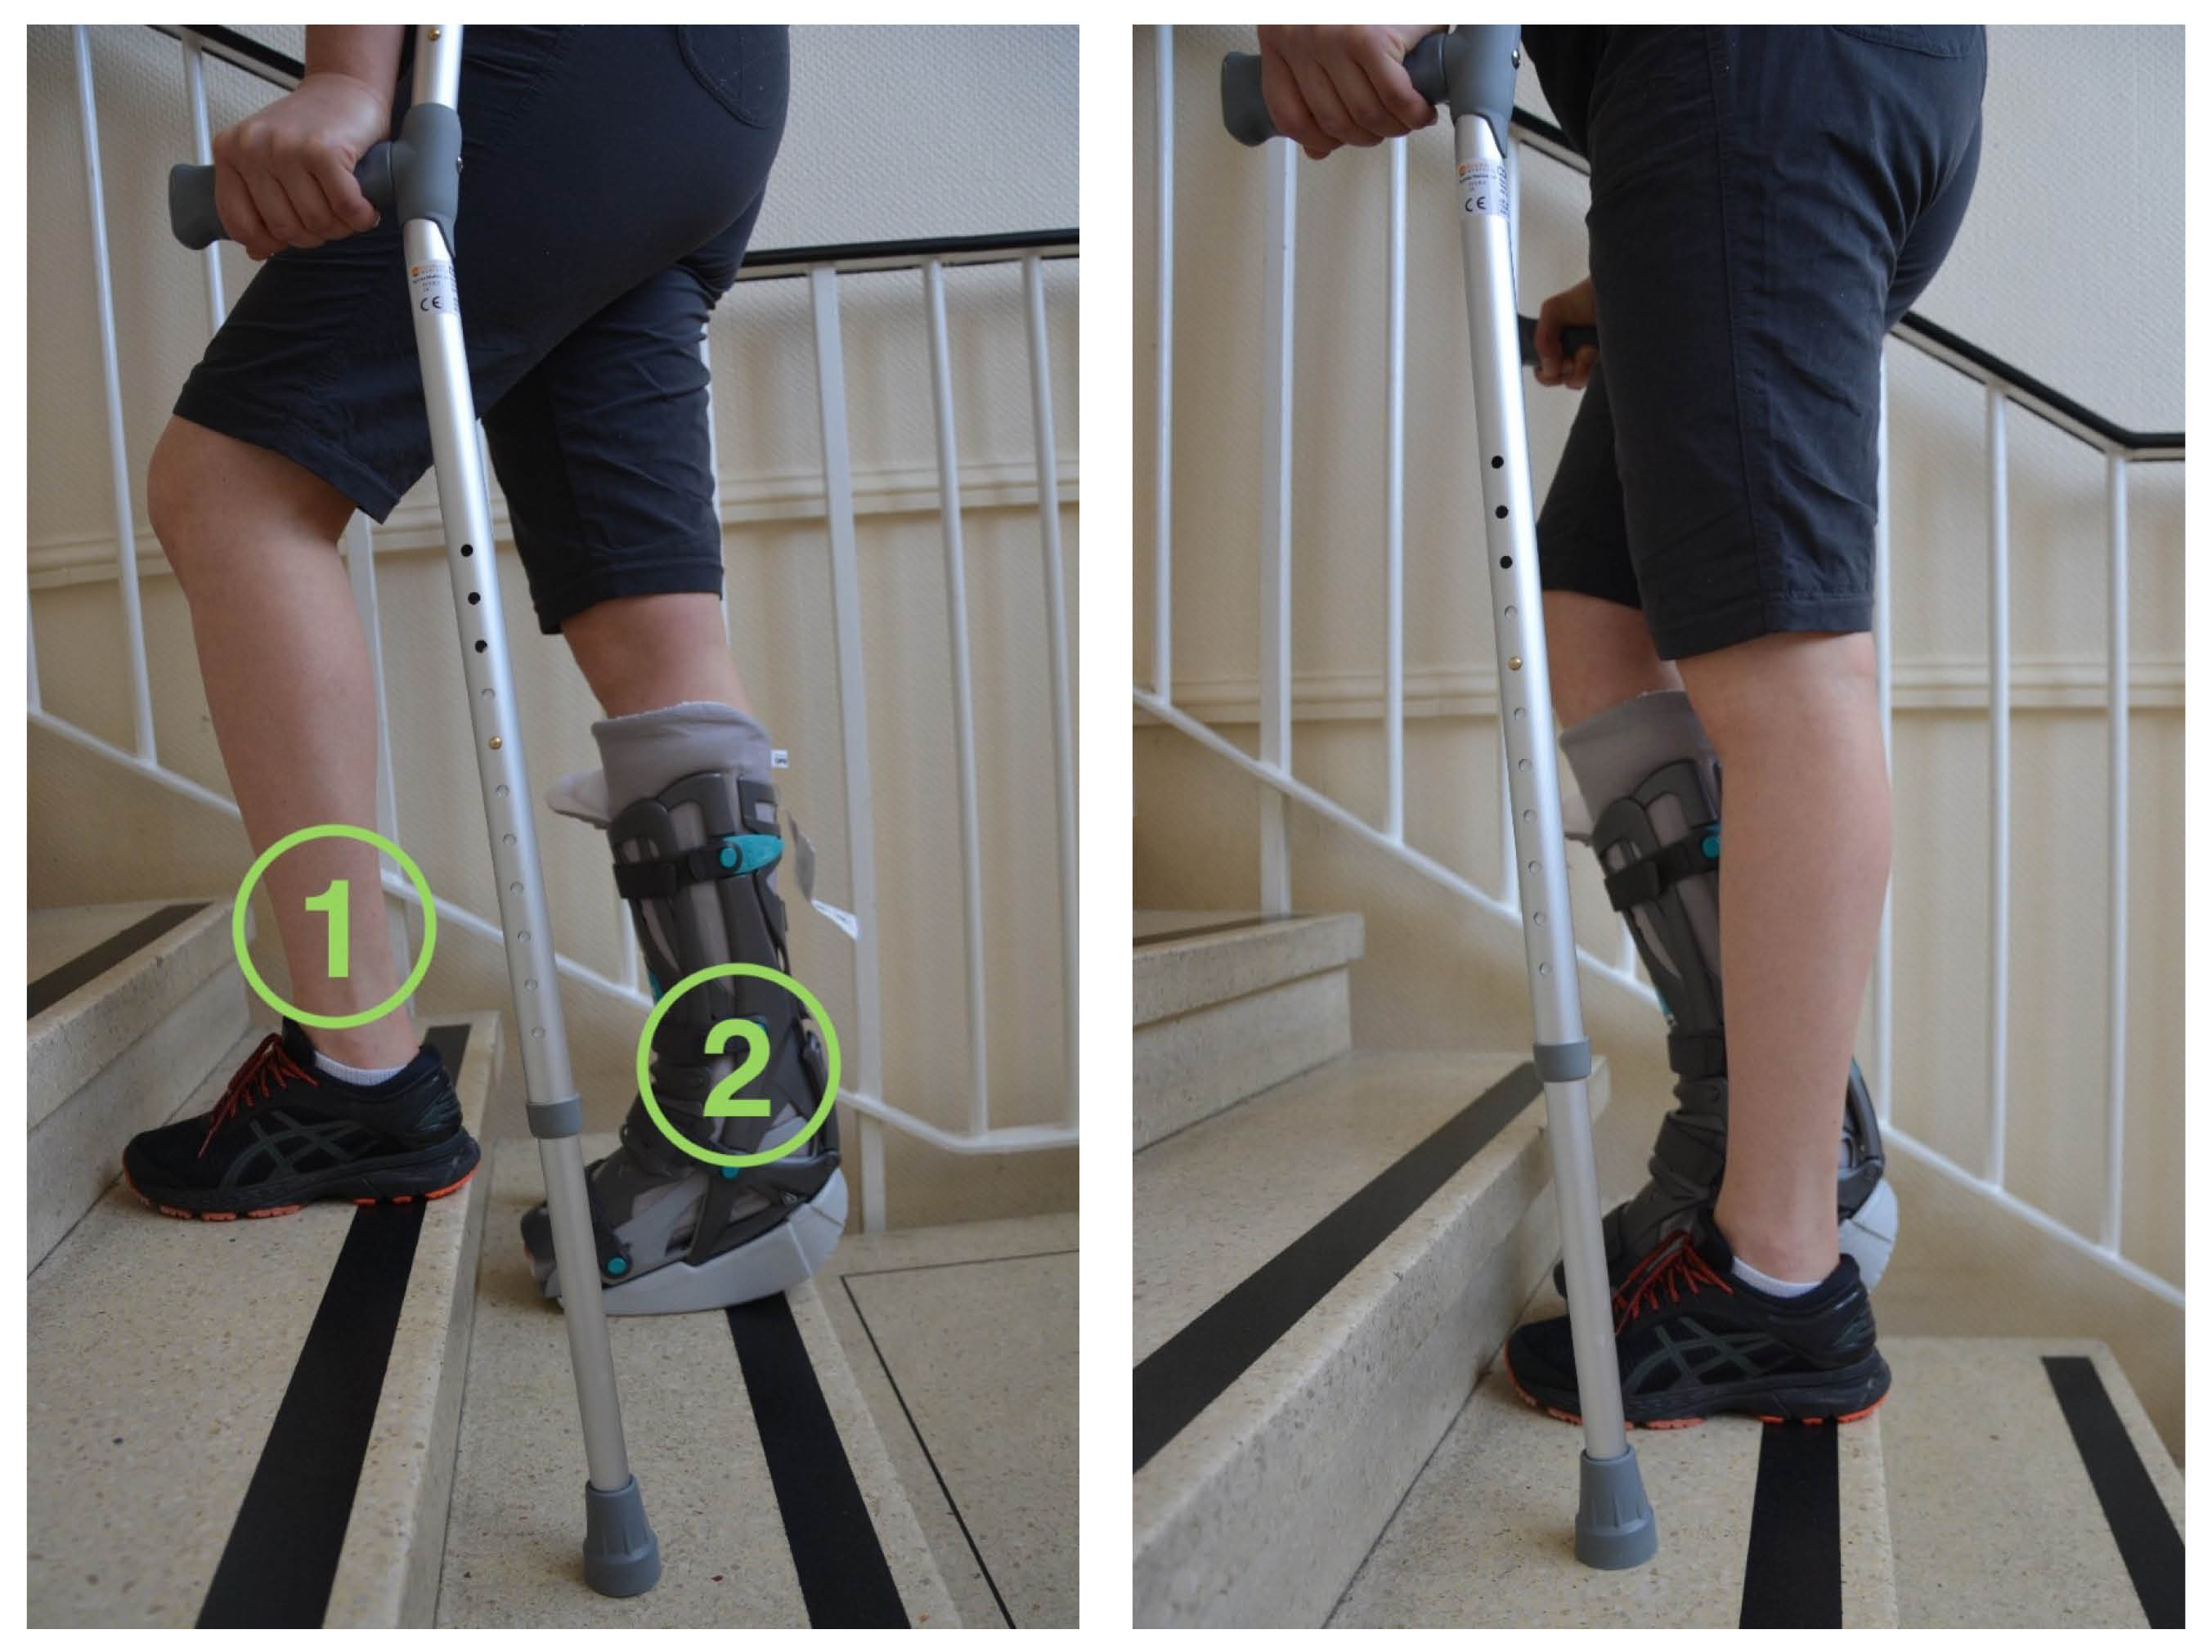 When going up the stairs, start with your non-affected leg first (1). Follow with the affected leg (2) and then the crutches.
 -
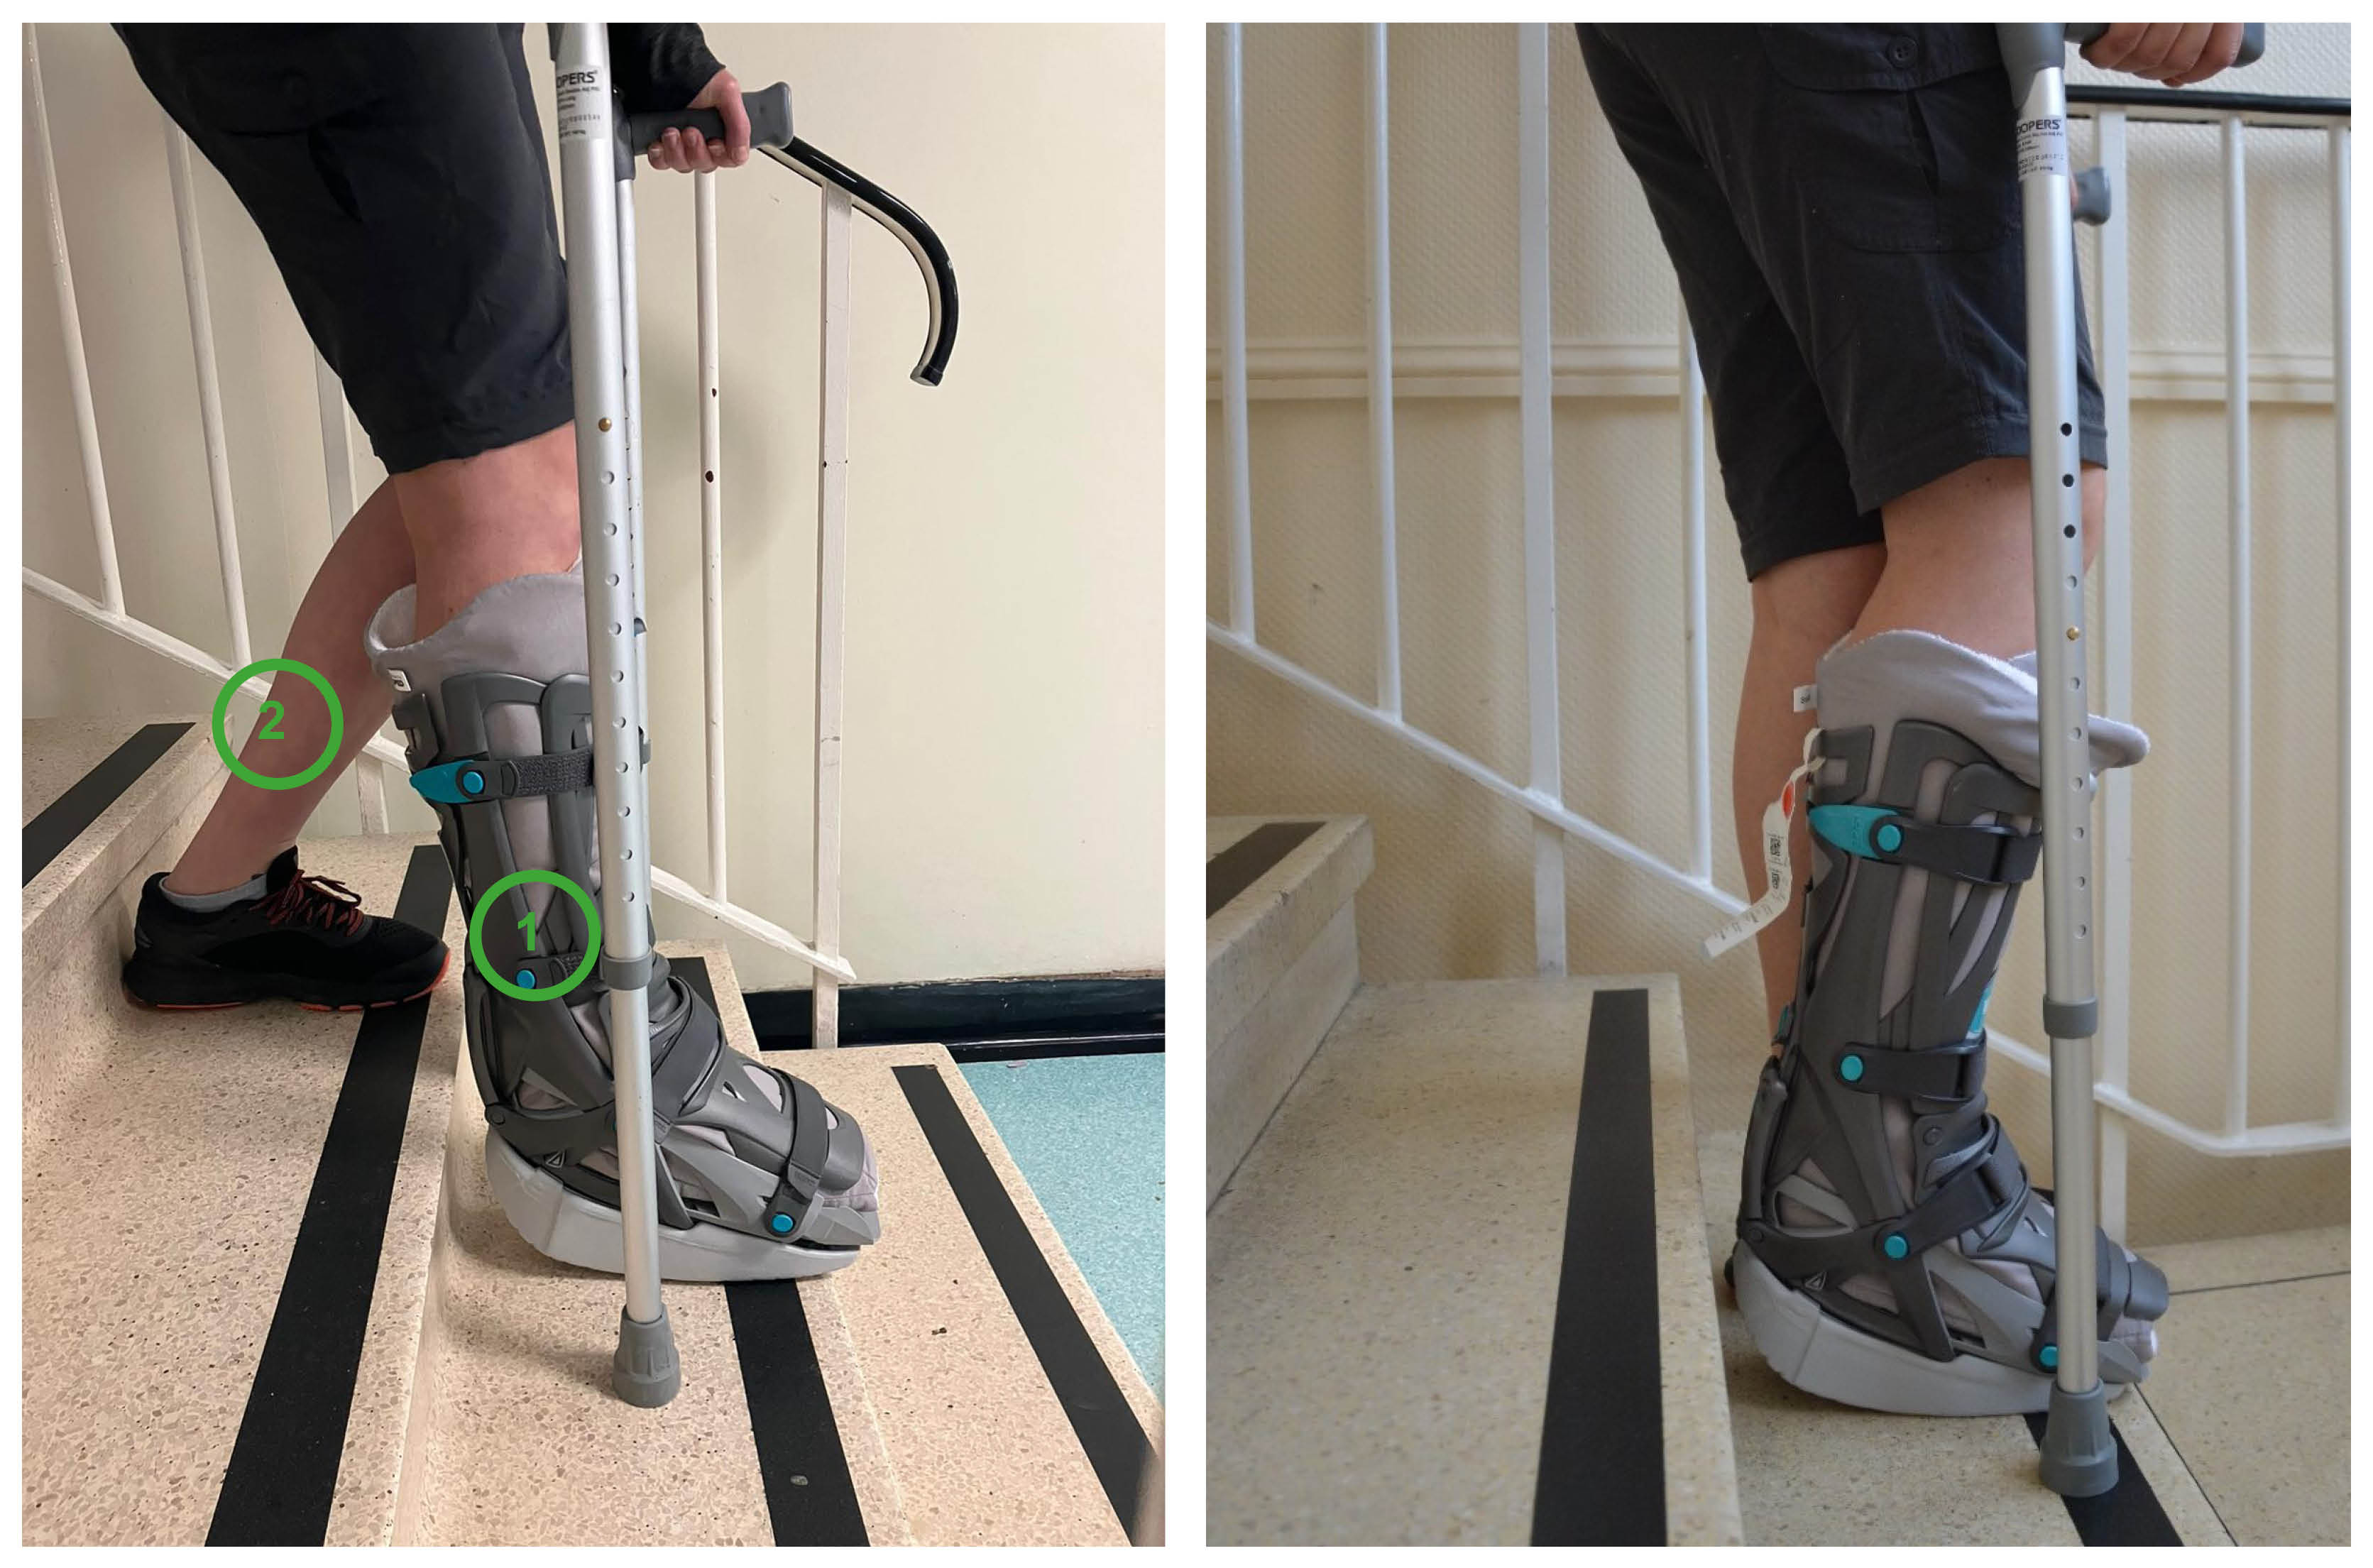 When going down the stairs, put the crutches down first and then your affected leg (1). Finally put down your non-affected leg (2).
Why are exercises important while I am wearing my boot?
Whilst wearing the boot, it is very important to keep moving ‘little and often’. This will help prevent your muscles wasting (becoming weak) and joint stiffness. It will also reduce your risk of developing blood clots.
Once you are referred to Physiotherapy, you will be given an appointment. The physiotherapists will help you with any questions or concerns you may have.
Looking after yourself
The boot liner provides compression around your calf muscle. This improves the circulation in your lower leg, whilst you are in the boot. It also helps the boot fit comfortably around your leg.
If your boot is creating pressure sores on your skin, place a dressing on the affected area(s).
Your hips or back may suffer because of the uneven gait caused by wearing the boot. If this happens, there are products you can buy that can help (such as wedges). These give extra elevation (height) under your non-affected leg. Those provided by OPED (called EVEN up) are one of many options.
You can release the tightness of your boot if you feel:
numbness
“pins and needles”
pain
swelling, or
your toes go unusually red / white / blue.
You can also try and raise your foot to help redness, swelling, and pain. If you need further help, call the Physiotherapy department. Their contact details are at the end of this booklet.
Recovering from an injury can take a long time. It is normal to get frustrated and anxious. But remember that while you are recovering, there are some things you can do to help your tendon to heal.
Limit the amount of alcohol you drink. For help calculating your alcohol intake, please go to the NHS Alcohol Units web page.
Stop smoking. Studies have shown that tendon healing is significantly delayed by smoking / nicotine. If you need support to stop smoking, please contact One You Kent on 0300 123 1220, or via email.
Eat a healthy diet, and drinking plenty of fluids (especially water). The quality of the food you eat will affect your healing and recovery. For advice and guidance, go to the NHS Eatwell Guide web page.
Stay as active as you can. Please discuss this with your clinician. If you need any extra support, do not hesitate to get in touch with us.
How do I look after my boot?
Unless told otherwise, for the first 4 weeks following your surgery, try and treat the boot like a plaster cast. Keep it on at all times.
You will be followed up in the Fracture Clinic by a clinical specialist physiotherapist between weeks 2 and 3. At this appointment a member of the team will reassess your tendon. They will change the sock liner for you. Please bring all your VACOped® equipment with you to these appointments.
If the cushion or sock liner gets wet or you notice your skin is becoming sore, you may remove the boot yourself to change the sock liner or check your skin. When removing the boot, keep your toes pointed down at all times. You may need someone to hold your foot to help you keep your ankle in this position.
After week 4, you can remove your boot each week to wash your leg and change the liner. Remember to keep your foot pointed at all times. Have a seated wash until week 9, when the boot can be removed indoors. Still be careful when showering after week 9.
When putting the straps back on, follow the numeric order given on the tag under each strap. Remember, do not remove your boot for the first 4 weeks following injury or surgery, unless told otherwise.
After week 4, you may remove the boot carefully to wash and change your sock. Ideally, do not do this more than once a week. Whilst doing this you must keep your toes and ankle pointed down, as shown in the picture. Do not stretch your calf. If you do, this could mean the tendon heals in a stretched position, which will affect your rehabilitation.
Washing the sock liner
You can wash the sock liner in the washing machine up to 60°C.
You will be given two sock liners by the hospital. If you need any more, you can buy them from the OPED UK web site.
You can remove the sole of the boot before getting into bed. Remember to put it back on before getting up.
Do not throw away or loose the key that comes with the boot. You will need that later on in your treatment.
-
.jpeg) To remove the sole, press the “buttons” on both sides of the boot. The sole will disengage.
To remove the sole, press the “buttons” on both sides of the boot. The sole will disengage. -
.jpeg) When putting the sole back on, push it onto the bottom of the boot. You should hear it “click” when in place.
When putting the sole back on, push it onto the bottom of the boot. You should hear it “click” when in place.
Please remember, do not remove your boot at all for the first month, unless your skin becomes sore.
Afterwards, you must not put any weight through your affected leg at all while:
having the sole off (especially when waking up from bed at night); or
when changing the sole, the liner, or showering / bathing.
For more information and explanatory videos on how to use the boot, please go to OPED UK web site.
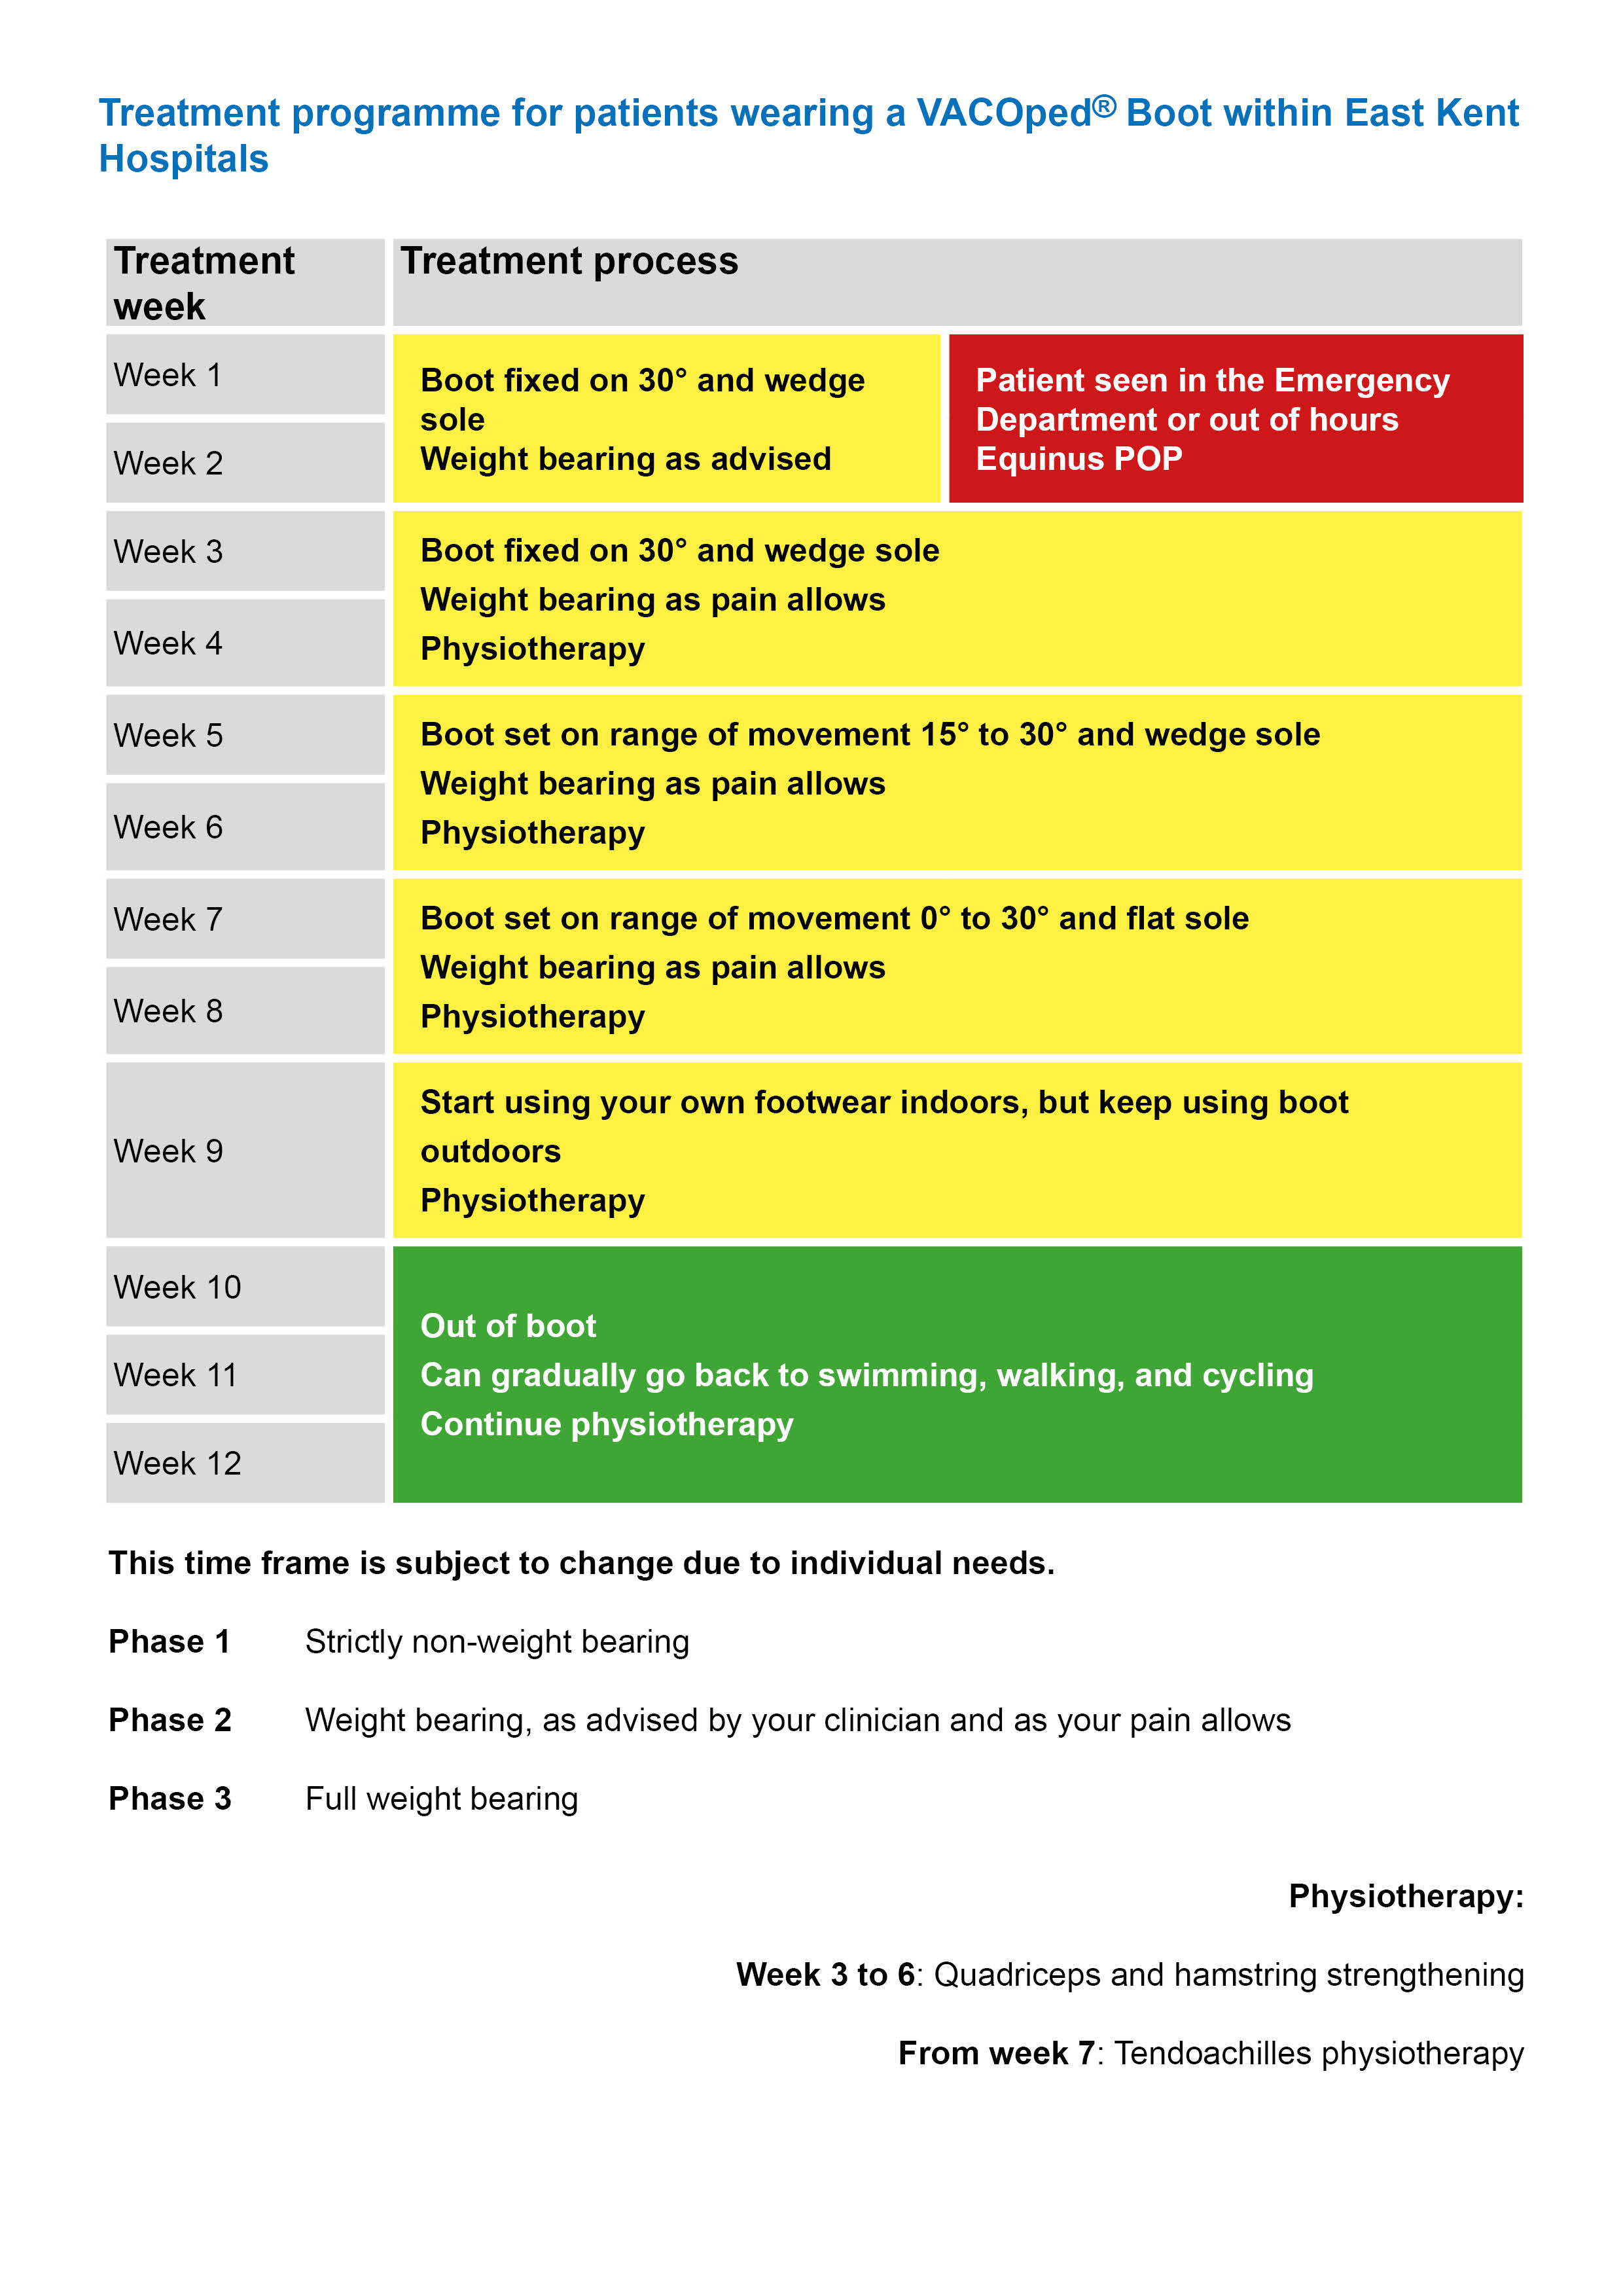
Weeks 1 and 2
If to start with, you are treated with a plaster cast.
Do not weight-bear (put any weight on your affected leg). Help yourself by walking with crutches.
Elevate (raise) your leg above the level of your heart as much as possible.
We will prescribe you blood thinning drugs to take for the first 6 weeks following your surgery.
We will refer you for physiotherapy.
Your cast must not get wet. Take care when having a wash, bath, or shower. Make sure you monitor any pressure areas.
If to start with, you are treated with a VACOped® Boot:
The boot will be locked with your foot pointing down at 30° and fitted with a wedged sole. You must wear the boot at all times.
You can weight-bear with crutches, as advised by your clinician. This will depend on how much pain you are feeling and on the advice of the person treating you.
The sole of the boot can be removed overnight. It must be put back on before putting any weight through it.
We will show you how to use the boot.
Your boot must not get wet. Take care when having a wash, bath, or shower. Make sure you monitor any pressure areas.
Have a dry wash for the first few weeks.
If you have a shower, the boot must remain on. Buy a waterproof cover to protect your leg from getting wet.
If you have a bath, the boot must remain on. Keep your leg hanging outside the bath.
Do not use home remedies, such as cling film or tape, as water could still get through.
Keep your leg raised above the level of your heart, as much as possible. Use pillows when you sit or lie down. Or if you are lying on your sofa, rest your leg on the back of the sofa.
We will prescribe you blood thinning drugs to take for the first 6 weeks following your surgery. If you were not given 6 weeks of medication, please contact the Physiotherapy department on 01227 783065 or via email. We will make sure the correct amount is prescribed for you.
We will refer you for physiotherapy.
The boot could cause blisters or wounds on the top of your foot and other areas. If your skin becomes sore, make sure you put a padded dressing over the area and tell your clinician.
The boot needs to be tight enough to keep your foot in the right position, to avoid sliding and movement inside it. But not too tight that it may cause discomfort, pins and needles, or numbness.
At this stage you can wiggle your toes. It is important to keep your toes moving. Every 2 to 3 hours, wiggle and spread your toes.
Weeks 3 and 4
At this stage the Achilles clinical specialist physiotherapist will review you.
If you were treated in a plaster cast, we will remove this in hospital. We will give you a VACOped® Boot, locked with your foot pointing down at 30°.
If you were treated in a VACOped® Boot you will remain in the boot, locked at 30°. You can weight-bear as your pain allows, with the help of crutches.
The boot must be worn at all times, and must not get wet. Take care when having a wash, bath, or shower.
Start quadriceps strengthening exercises at home.
Remember to bring your crutches, pump, and a clean liner (if it needs changing) to your clinic appointment.
There are several exercises you can start at week 3, whilst you are still wearing the boot. These exercises will help keep your leg strong.
Below you will find quadricep, hamstring, and gluteal strengthening exercises. You need to work each muscle group separately. The advice below will suggest how to progress with each exercise.
For the best recovery possible, please complete each exercise at least 5 days a week.
Quadriceps strengthening exercises

Static quadriceps exercise
Either sit or lie down, with your knee straight out on a flat surface.
Tighten the muscles on the front of your thigh, by pushing the back of your knee down into the bed.
Hold for 5 to 10 seconds, and relax.
Repeat the exercise 10 times, then rest for 60 seconds. Aim to do this 2 to 3 times.

Inner range quadricep exercise
Lie down, and place a rolled towel under your knee for support.
Tighten your thigh muscle and lift your foot up to straighten your knee. Keep your knee on the towel at all times.
Hold for 5 to 10 seconds, and relax. Repeat the exercise 10 times, then rest. Aim to do this 2 to 3 times.
Do not move on to the next exercise until you can lift your knee completely straight for the full 10 repetitions.

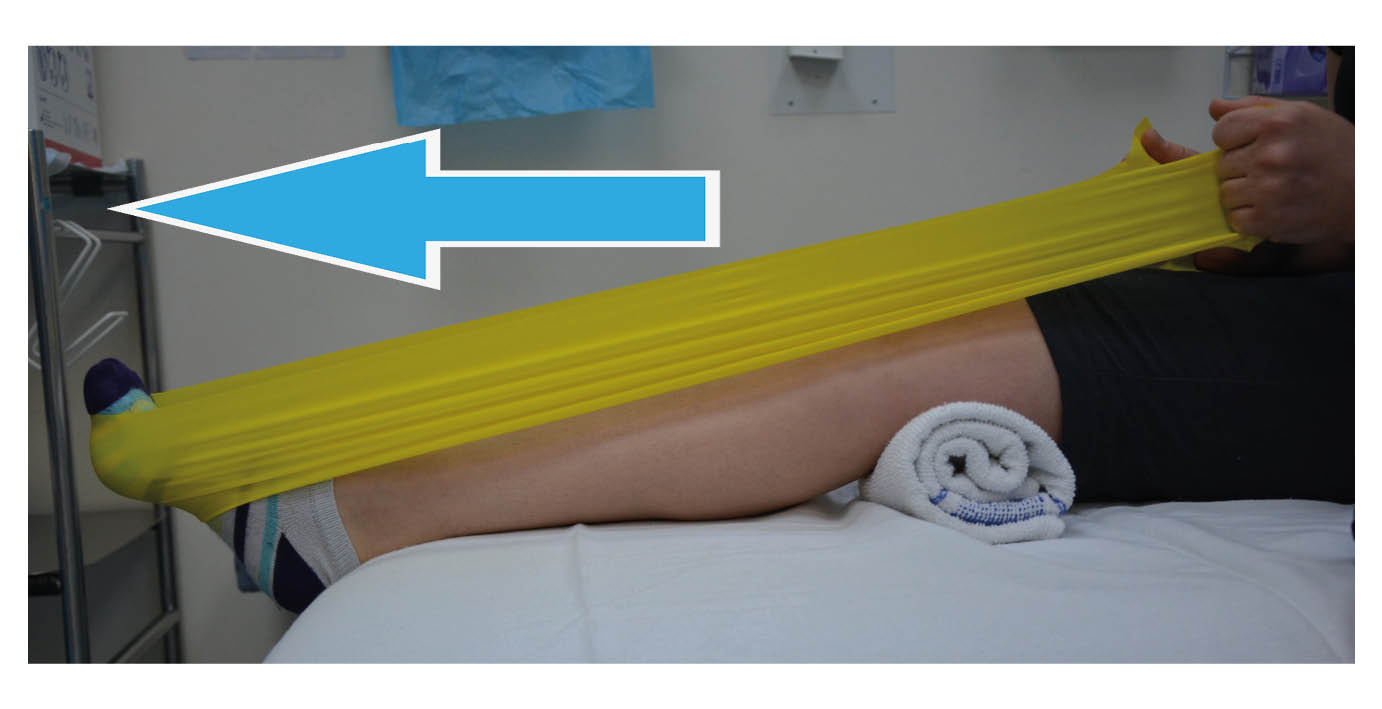
Straight leg raise
With your leg straight on a flat surface, tighten your thigh muscles.
Hold your knee straight and lift your leg up. Aim to lift your leg 30 to 40cm off the surface, then lower it down gently.
Aim to hold your leg up for at least 5 seconds, and slowly lower it back down.
Repeat the exercise 10 times, then rest for 60 seconds. Aim to do this 2 to 3 times.
Continue to do this exercise over the next 7 weeks.

Seated knee extension exercise
Sit down with your legs hanging over the edge of a bed or chair.
Raise your foot until your leg is straight.
Hold for 5 to 10 seconds, then slowly lower it back down.
Repeat the exercise 10 times, then rest for 60 seconds. Aim to do this 2 to 3 times.
Hamstring strengthening exercises

Prone knee bend exercise
Lie flat on your front.
Slowly bend your knee up to 90° and lower it back down again.
Repeat the exercise 10 times, then rest for 60 seconds. Aim to do this 2 to 3 times.
If you find this too easy, do this exercise standing up (see Standing exercises below).

Standing knee flexion
Stand up and hold on to something sturdy for support, for example your kitchen counter.
Make sure you keep your back straight with every exercise.
Stand with both legs straight and together.
Bend your knee, bringing your foot up behind you. Keep your hips straight and your knees together.
Relax your leg back down, and repeat.
Repeat the exercise 10 times, then rest for 60 seconds. Aim to do this 2 to 3 times.
If this exercise becomes too easy, speak to your physiotherapist. They can give you a resistance band.
Gluteal strengthening exercises

Hip extension in prone
Lie on your front.
Tighten your bottom muscles and lift your thigh up off the floor. Keep your knee straight at all times. Do not allow your pelvis to lift off the floor.
Hold for 5 to 10 seconds, then lower down gently.
Repeat the exercise 10 times, then rest for 60 seconds. Aim to do this 2 to 3 times.
Continue to do this exercise over the next 7 weeks.

Hip abduction in standing
Standing up tall with your feet together.
Bring your leg out to the side, keeping your knee straight. Keep your body straight, do not lean to the side as you lift your leg.
Gently lower your leg back down again.
Repeat the exercise 12 times, then rest for 60 seconds. Aim to do this 3 times.
Do not move on to the next exercise until you can complete this one, without your body leaning away from your affected leg.
Progress to side lying if this exercise is too easy.

Hip abduction in side lying
Lying on your uninjured side, lift your top leg up towards the ceiling.
Keep your knee straight at all times. Your hip should be in line with your knee and ankle. Do not allow your hips to roll back as you lift your leg.
Repeat the exercise 12 times, then rest for 60 seconds. Aim to do this 3 times.
Continue to do this exercise over the next 7 weeks.
Weeks 5 and 6
We will alter your boot to give you a range of movement of 15° to 30°. If you want, you can do this yourself. If you have been shown how to alter your boot by the hospital, please refer to the User Guide you were given.
Start to gently bend your ankle up and down whilst wearing your boot. Your ankle may feel tight, so do not force the movement into any pain or too much of a stretch. Just gently start to get your ankle moving again.
Continue to do the exercises from weeks 3 and 4, as well as those shown below.
From week 5, you can remove your boot to wash your foot. Only do this while sitting. Keep your foot pointing down at all times when the boot is off. Only do this once a week if possible. You must not stand up or take any weight through your foot without the boot on. Stay seated while drying your leg. Put the boot back on as quickly as possible, as care needs to be taken not to stretch or re-rupture your tendon.
Wear the boot at all times when showering. Make sure the boot is covered and does not get wet. Please speak to your therapist for advice on where to buy protective covers for your boot.
Ankle range of movement
Bend your ankle up and down in the boot in any position. You may find this most comfortable when:
lying on your front with your foot hanging over the edge of the bed; and / or
kneeling on a chair with your foot hanging over the edge.
Pointing your ankle down will be difficult as your muscles are weak. Keep practicing and focus on the movement coming from the back of your heel and not your toes. We will discuss this with you in more detail at your Achilles clinic appointment.
Complete this exercise 10 times, once or twice a day.
-
.jpg) Bend your ankle up
Bend your ankle up -
.jpg) Bend your ankle down
Bend your ankle down
Your aim at week 6 is to have:
a full range of movement in your hip and knee; and
no pain in your Achilles tendon while you are resting.
Weeks 7 and 8
At week 7, your boot will be altered again. This time giving you 0° to 30° range of movement at your ankle. The wedge sole will also be swapped for a flat sole. Once this is done, you will notice a big difference when walking in the boot.
Active ankle range of movement
Remove your boot once a day, to carry out the following gentle range of ankle movement exercises. Only do these exercises if you feel no pain while doing them. Aim to complete each exercise 10 times, three times in a row. Rest for 60 seconds between each set of 10.
Active plantar flexion (pointing your toes)
When bending your ankle up and down, do not bend your ankle up past its neutral position. We do not want to stretch your Achilles tendon at this stage. This is because the strength of the tendon is at its weakest at this time. Stretching it could mean elongating (over-stretching) or re-rupturing your tendon.
-
.jpg) Do not bend your ankle up past its neutral position (where the line is drawn)
Do not bend your ankle up past its neutral position (where the line is drawn) -
.jpg) Point your toes
Point your toes
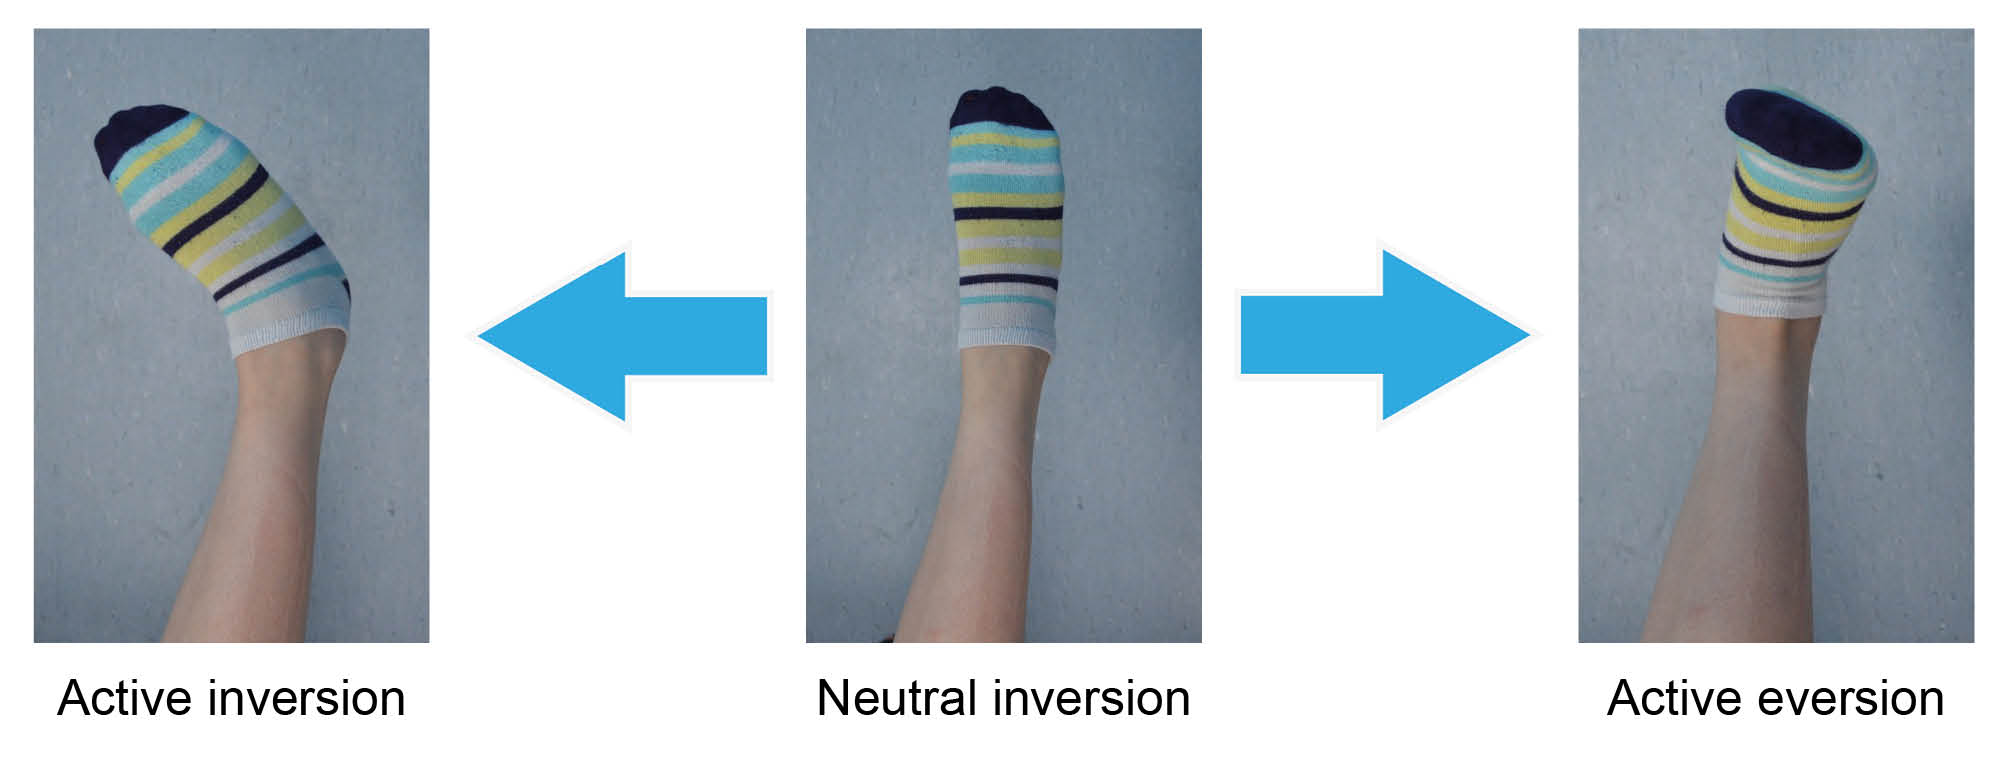
Inversion: keep your leg straight and turn your ankle inwards.
Eversion: keep your leg straight and turn your ankle out and up.
Isometric ankle strengthening exercises
With your boot on, you can now start to strengthen the muscles around your ankle. This is known as isometric strengthening. It is a way of strengthening the muscles around a joint without moving the joint itself.
The muscles in your lower leg move your ankle in four directions. It is important to target all four of these muscle groups.
These exercises can be completed up to 3 times a day, if possible. For each exercise, aim to hold the position for 5 to 10 seconds as you are able, then relax. Repeat each exercise 5 to 10 times.
Dorsiflexion
Place your uninjured foot over the top of the boot.
Push the top of your injured foot up into the boot, resisting with your other foot. You should feel the muscles in the front of your lower leg tighten but your ankle should not move. Do not push if you feel pain.
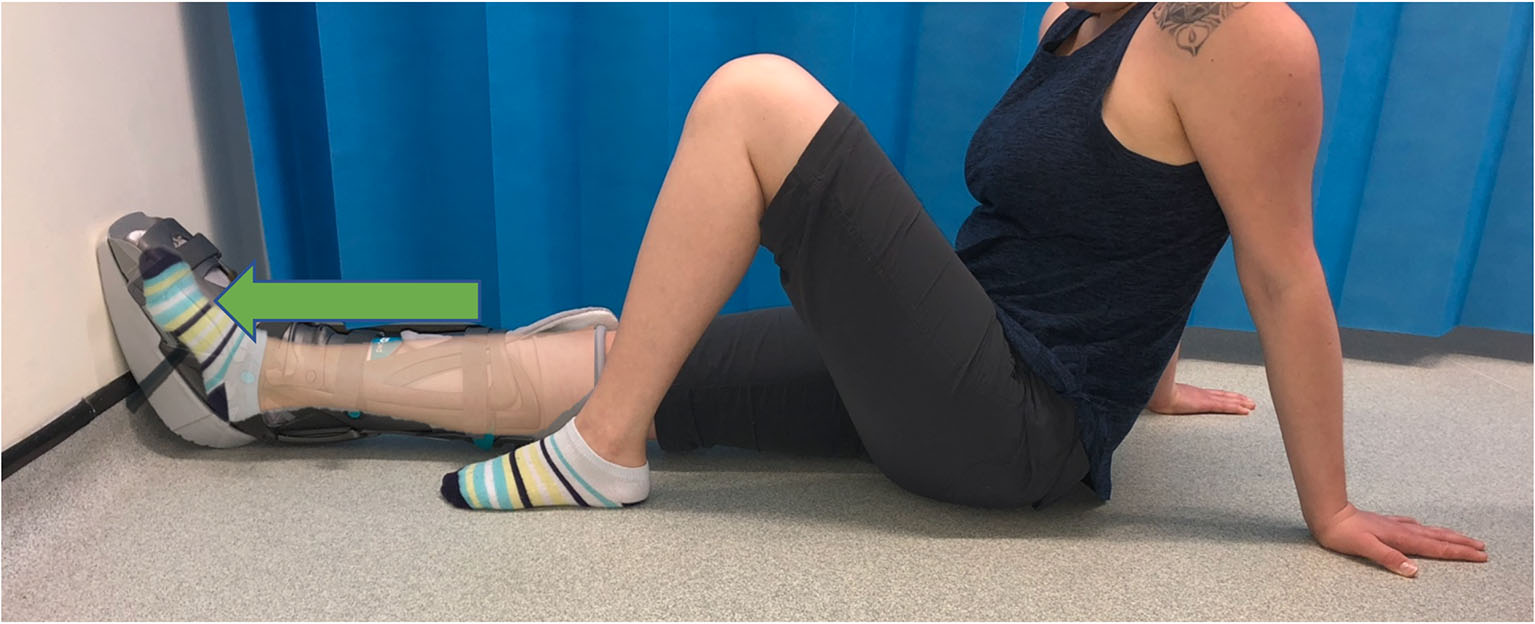
Plantar flexion
In long sitting, place your hands behind you for support. Rest your feet against a wall or the end of the bed.
Push your toes into the wall, as if to try and push the wall away. Feel the muscles of your calf tightening. Do not move your ankle.

Inversion
Push in against your other foot (toe to toe). You should feel the muscles on the inside of your calf tighten. Do not push into any pain.
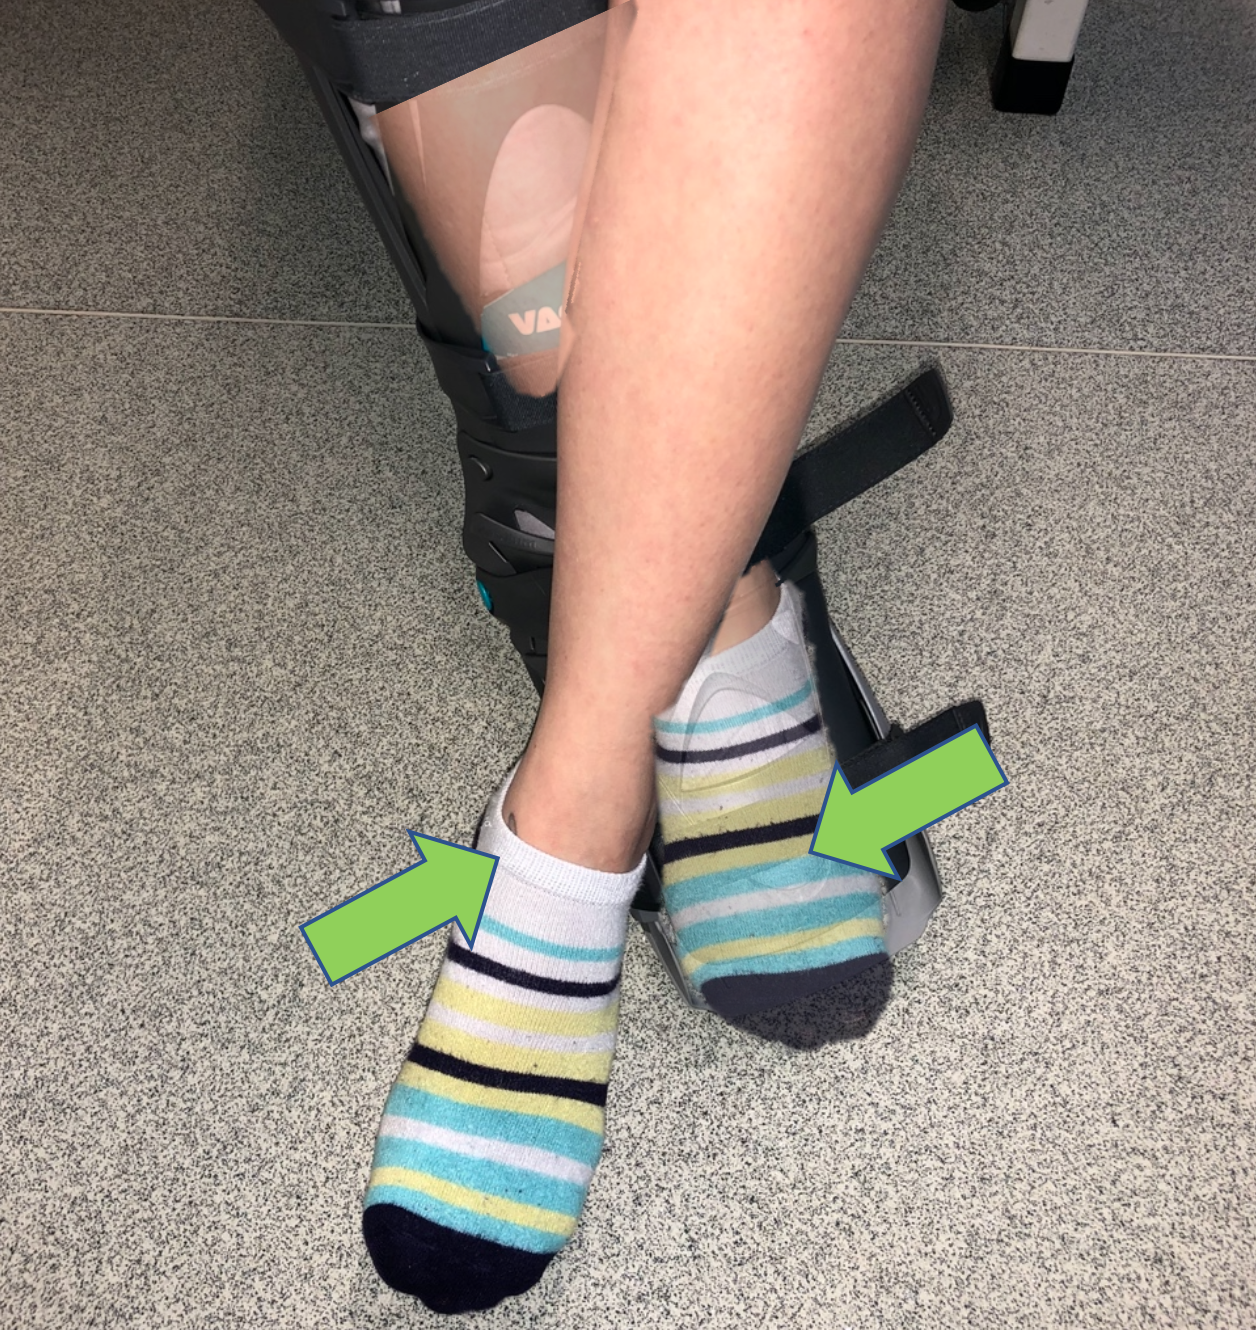
Eversion
Cross your injured leg behind your non-injured leg.
Push the little toe of your injured leg into the heel of your non-injured leg. You should feel the muscles on the outside of your calf tighten. Do not push into any pain.
Remember, these exercises should not be painful. Please start with a gentle push, approximately half of your strength. Gradually push harder, if the exercise remains pain free.
Your aim by week 8 is to walk as normally as possible, with or without crutches.
Week 9
You can remove the boot while indoors, but you must wear supportive footwear indoors at all times. Continue to wear the boot outside. If the isometric ankle strengthening exercises above are too easy by week 9, you can stop them and move on to the exercises shown below.
Isotonic ankle strengthening
These exercises strengthen the muscles around your ankle joint, by moving the joint into resistance.
Aim to complete each exercise 10 times, then rest for 60 seconds. Do this 2 to 3 times.
Do not pull the band too tight against the bottom of your foot. We do not want to stretch your tendon yet.
-
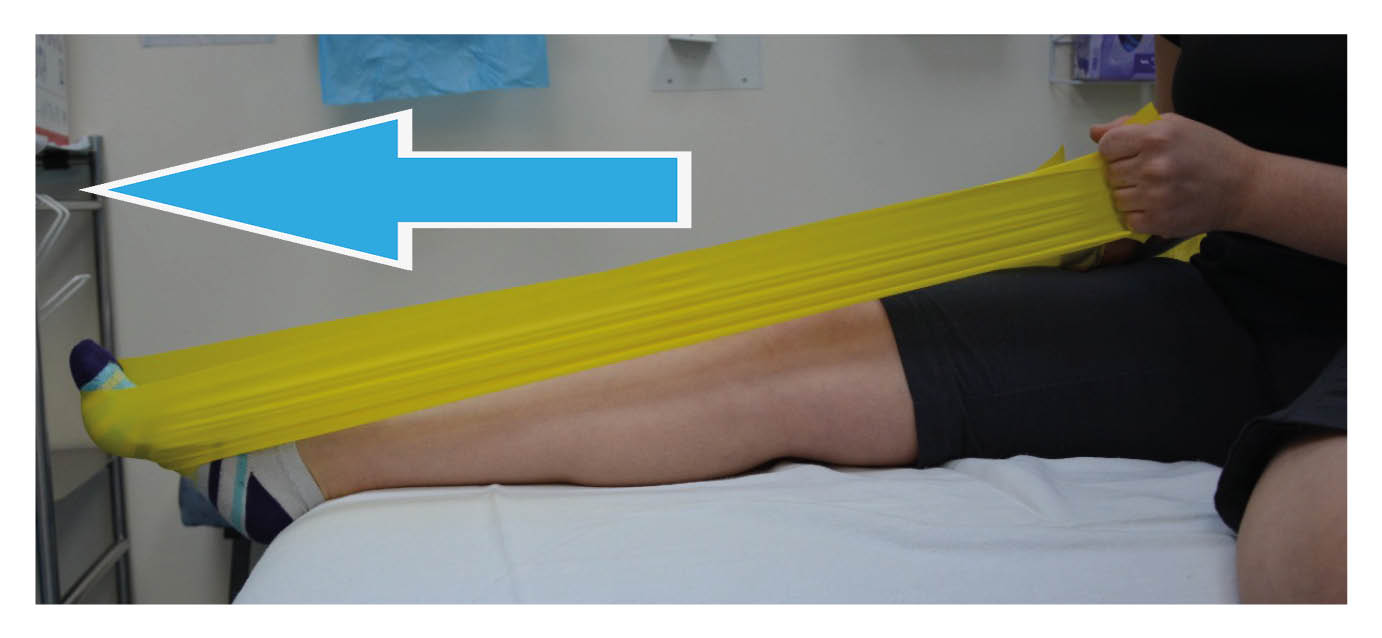 Plantar flexion with the knee straight; Point your toes, pushing into the band.
 -
 Plantar flexion with the knee slightly bent; Point your toes, pushing into the band.
-
.jpg) Inversion; Turn your ankle in, pulling in against the resistance band.
Inversion; Turn your ankle in, pulling in against the resistance band. -
.jpg) Eversion; Turn your ankle out, pulling out against the resistance band.
Eversion; Turn your ankle out, pulling out against the resistance band.
.jpg)
Balance exercises
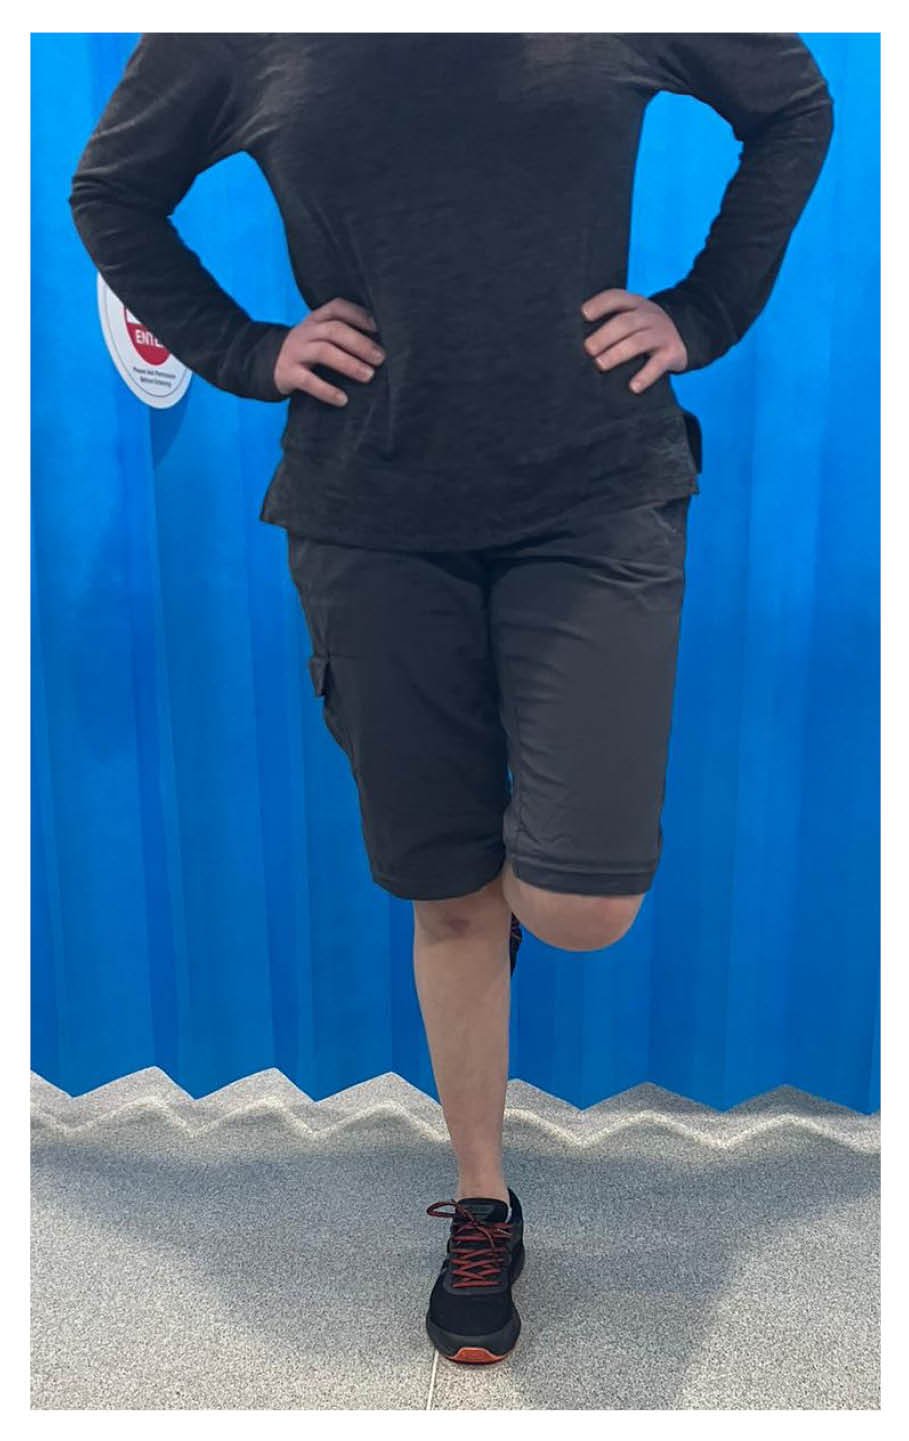
You must start to challenge your balance.
Practice this by standing on one leg without holding on.
Aim to keep your balance unsupported for up to 10 seconds. Increase this as your balance improves.
See how the balance on your injured leg compares to your non-injured leg.
If this gets too easy, try closing your eyes.
Your aim by week 9 is to:
have full side-to-side movement of your ankle, and
be able to point your toes down to 30° without the boot on.
You will now be referred for more formal physiotherapy in the Physiotherapy department. At this stage your physiotherapist will progress your exercises accordingly.
Week 10
From week 10, the boot can be fully removed (indoors and outdoors). Your aim is to walk without a limp or crutches. At this stage you may return to swimming and cycling to help increase your fitness.
It is common to have some heel pain at this time. Buy gel heel cups to help offload the tendon and reduce the forces through your heel whilst you walk.
Your exercises will be progressed to further strengthen your leg and ankle and improve your balance.
Ankle strengthening exercises
From week 10, add some resistance to your seated heel raise exercise.
Option 1. Apply downward pressure to your affected leg with your hands; or
Option 2. Use a weight, such as a dumbbell, and hold this in place.
Aim to complete this exercise 10 times, then rest for 60 seconds. Do this 2 to 3 times.


Week 12
The Physiotherapy department should contact you within 2 to 3 weeks of being discharged from the Achilles clinic. At week 12 you can start the exercise below.

Standing heel raise
Using support, try to distribute your weight as evenly as possible.
Push up onto your toes. Think about pulling your heel bone up and in towards your Achilles tendon.
Aim to complete this exercise 10 times, then rest for 60 seconds. Do this 2 to 3 times.
Over the next 3 to 9 months you will work closely with your physiotherapist to achieve your goals. Your goal(s) could be doing day to day tasks or returning to sport.
We do not recommend:
a return to running until 5 to 6 months after your injury; or
participation in any sports again until 9 to 12 months after your injury.
When you start again will depend on whether your milestones have been met. Your physiotherapist will discuss these milestones with you and re-assess your injury regularly.
Caution: for the first 12 weeks after your injury, your healing tendon will be at its weakest. Do not try to do too much, too soon. If you have any concerns or queries, please speak to your physiotherapist.
Contact details
Physiotherapy Department
Telephone: 01227 783065
What do you think of this leaflet?
We welcome feedback, whether positive or negative, as it helps us to improve our care and services.
If you would like to give us feedback about this leaflet, please fill in our short online survey. Either scan the QR code below, or use the web link. We do not record your personal information, unless you provide contact details and would like to talk to us some more.
If you would rather talk to someone instead of filling in a survey, please call the Patient Voice Team.
Patient Voice Team
Telephone: 01227 868605
Email